Complex die cut parts often look easy on a drawing. Then the first trial starts, and reality joins the meeting. Corners deform. Holes shift. Adhesive overflows. Waste does not release cleanly. I have seen OEM projects lose time because buyers expected one trial to solve a shape that needed real engineering validation.
Complex shapes usually need more than one die cutting trial because material behavior, tooling pressure, tolerance control, waste removal, adhesive stability, and assembly fit must all be tested under real production conditions. One trial may confirm the basic shape, but it rarely proves long-term manufacturability. At Sanken, we use die cutting trials to reduce risk before mass production, not simply to make a sample look good.
A good die cutting trial is not a delay. It is insurance. And in manufacturing, insurance is usually cheaper than panic.
Why are complex die cut shapes harder to produce?
A simple square gasket is usually easier to cut.
A complex shape is different.
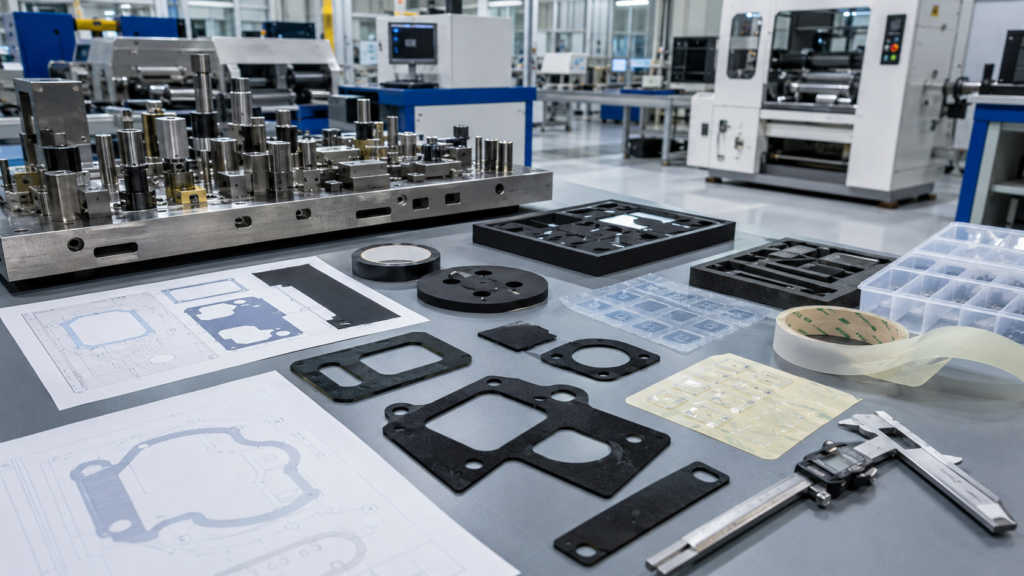
It may include narrow walls, small holes, sharp corners, thin bridges, multilayer adhesive areas, irregular curves, or tight spacing between cut lines.
These features increase production risk.
The material may stretch.
The waste may tear.
The adhesive may flow.
The foam may compress unevenly.
The part may look correct before release but deform after removal from the liner.
This is why complex shapes need trial production before mass production.
At Sanken, we do not judge complexity only by appearance. We check the material, structure, tolerance, function, and assembly method together.

What usually goes wrong during the first die cutting trial?
The first trial often reveals hidden problems.
Common issues include:
- Rough edges
- Dimensional drift
- Adhesive overflow
- Waste removal failure
- Hole position deviation
- Foam compression marks
- Film stretching
- Layer misalignment
- Difficult liner release
- Part deformation after peeling
These issues are not always supplier mistakes.
Sometimes they are design risks.
Sometimes the selected material does not match the shape.
Sometimes the tolerance is too tight for the material behavior.
Sometimes the tool design must be adjusted.
That is the purpose of a trial.
It shows what the drawing cannot show.
Why does material behavior affect complex shapes?
Every material behaves differently during die cutting.
Foam compresses.
Rubber rebounds.
PET film stretches.
Non-woven fabric may release fibers.
Adhesive tape may flow at the edge.
Conductive materials may require precise layer alignment.
A complex shape increases stress during cutting and waste removal.
For example, a narrow foam strip may stretch or tear when released.
A small adhesive ring may create glue overflow around the inner edge.
A thin PET insulation part may curl after cutting if tension is not controlled.
At Sanken, we study the material before finalizing the process.
That includes thickness, density, hardness, compression behavior, adhesive structure, surface condition, and storage stability.
Why can one good sample still fail later?
One good sample does not prove stable mass production.
This is a common trap.
A supplier may adjust the first sample slowly and carefully.
But mass production is different.
During longer production runs, new variables appear:
| Production Factor | Possible Problem |
|---|---|
| Tool wear | Rough edges or dimensional drift |
| Roll tension change | Material stretching |
| Temperature change | Adhesive softening |
| Waste removal speed | Torn parts or stuck waste |
| Material batch variation | Thickness or performance changes |
| Operator adjustment | Process inconsistency |
For OEM customers, the real question is not “Can you make one?”
The real question is “Can you make the same part again and again?”
That is why complex die cut parts often require more than one trial.
How does tooling design change after the first trial?
Tooling is rarely perfect on the first attempt for complex shapes.
The first trial may show that the blade angle, cutting depth, pressure balance, or waste removal design needs improvement.
Tooling adjustments may include:
- Changing cutting clearance
- Improving blade sharpness
- Adjusting pressure distribution
- Modifying waste stripping areas
- Reinforcing narrow sections
- Changing kiss cutting depth
- Optimizing hole punching sequence
For adhesive-backed parts, kiss cutting depth is especially important.
If the cut is too deep, the liner may break.
If the cut is too shallow, waste removal becomes unstable.
At Sanken, we use trial results to improve tooling before mass production.
That is much cheaper than discovering tooling weakness during a bulk order.
Why do adhesive parts need extra trials?
Adhesive die cut parts are more sensitive than many buyers expect.
The adhesive layer can move, flow, or overflow during cutting.
Complex shapes make this worse.
Small holes, narrow strips, sharp corners, and thin walls increase adhesive edge risk.
Common adhesive trial problems include:
- Glue overflow
- Liner damage
- Difficult peeling
- Edge lifting
- Layer separation
- Adhesive strings
- Waste sticking to the part
- Parts sticking together during packaging
At Sanken, we control adhesive lamination, liner selection, cutting pressure, roll tension, and storage conditions.
We also check the bonding surface.
Metal, glass, ABS, PC, PP, PE, rubber, painted surfaces, and powder-coated surfaces all require different adhesive thinking.
A tape part that looks clean but peels off during assembly is not a successful part.
Why does tolerance become harder with complex shapes?
Tolerance control becomes more difficult as shape complexity increases.
A large simple gasket may allow more dimensional stability.
A complex part with many holes, slots, narrow bridges, or multilayer areas creates more tolerance risks.
Tolerance issues may affect:
- Assembly fit
- Screw alignment
- Sealing performance
- Adhesive position
- Electrical insulation
- Sensor clearance
- Airflow or light path
- Final product appearance
A small hole shift can stop assembly.
A tiny inner edge error can block a connector.
A narrow gasket wall can deform and create a leakage path.
At Sanken, we identify critical dimensions before trial production.
Not every dimension needs the tightest tolerance.
The important thing is knowing which dimensions affect function.
That is where engineering review saves cost.
How many die cutting trials are usually needed?
There is no fixed number.
Simple parts may need one trial.
Complex parts may need two, three, or more.
The number depends on:
- Material difficulty
- Shape complexity
- Tolerance requirement
- Adhesive structure
- Tooling type
- Testing requirement
- Assembly risk
- Production volume
For example, a simple foam pad may be approved quickly.
A multilayer adhesive gasket for automotive electronics may need several rounds of validation.
That does not mean the supplier is slow.
It means the supplier is controlling risk.
At Sanken, we prefer a careful trial process before mass production instead of emergency correction after shipment.
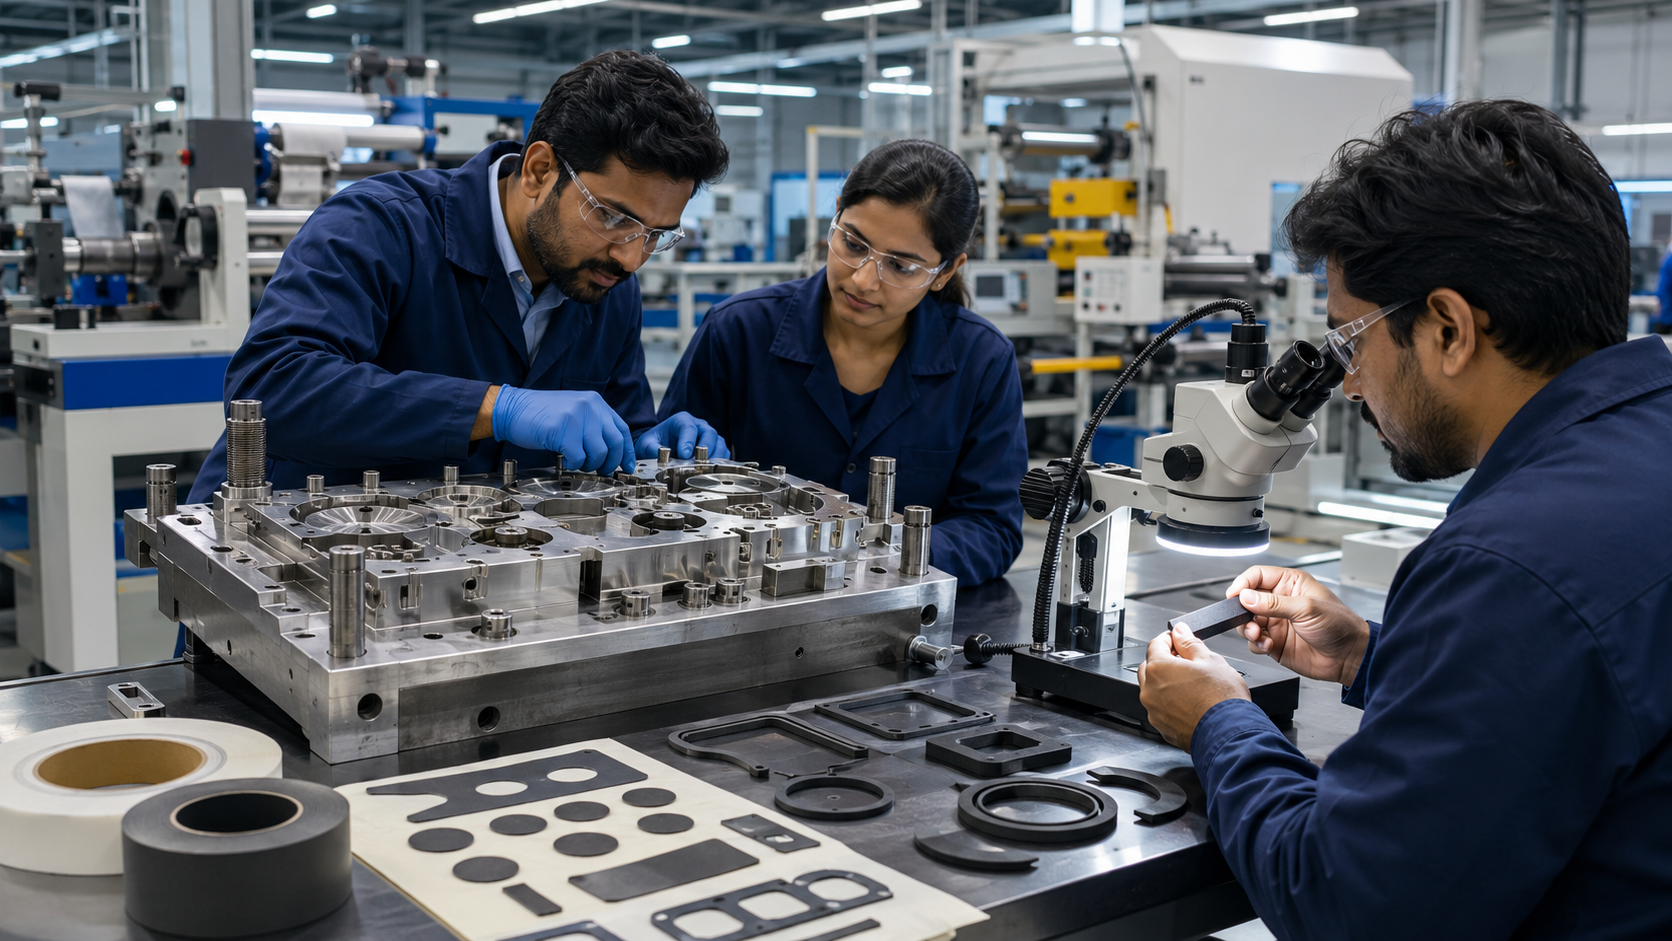
What should buyers check during each trial?
Buyers should not only check whether the part “looks right.”
They should check whether the part can actually work.
Important trial checks include:
- Outer dimensions
- Inner openings
- Hole positions
- Thickness
- Edge quality
- Adhesive position
- Liner release
- Waste removal quality
- Assembly fit
- Functional performance
Depending on the application, buyers may also need compression testing, peel testing, aging testing, sealing verification, or temperature exposure testing.
For automotive, electronics, medical, and industrial OEM parts, visual approval alone is risky.
A beautiful sample can still be a terrible production part.
Manufacturing has a sense of humor. Usually, it is expensive.
Why do complex parts need assembly testing?
A die cut part does not live on a table.
It lives inside a product.
That product may involve screws, pressure, heat, vibration, moisture, dust, electrical components, optical surfaces, or moving parts.
A part may pass dimensional inspection but fail assembly.
For example:
- A foam gasket may compress unevenly
- A tape part may shift during installation
- A PET insulation film may curl
- A rubber seal may require too much closing force
- A narrow part may tear during liner removal
At Sanken, we encourage customers to test samples in the real assembly environment before mass production.
This helps confirm whether the part is not only cut correctly, but also usable.

How does Sanken reduce trial-and-error cost?
At Sanken, we do not treat trials as random experiments.
We use them as controlled engineering steps.
Our process usually includes:
- Drawing review
- Material evaluation
- Tooling design
- First trial cutting
- Dimension inspection
- Functional review
- Tooling adjustment
- Second trial validation
- Pre-production confirmation
- Mass production control plan
Our capabilities include:
- Precision die cutting
- Rotary die cutting
- Adhesive laminating
- Kiss cutting
- Foam converting
- Rubber converting
- PET film converting
- Non-woven material converting
- Hot pressing
- Spraying and gluing
- Silk screen printing
- Injection molding support
This helps OEM customers reduce repeated sampling, avoid unstable production, and shorten the path from drawing to reliable mass production.
Conclusion
Complex shapes need more than one die cutting trial because material behavior, tooling, adhesive, tolerance, waste removal, and assembly fit must be proven before mass production. At Sanken, we use controlled trials to help OEM customers reduce risk, save cost, and build stable custom die cut parts.