What Materials Avoid Bubble Generation During Optical Film Die Cutting?
Bubble generation during optical film die cutting is one of the most frustrating problems for engineers and purchasing teams. A part may look acceptable after cutting, but bubbles appear after lamination, storage, handling, or final assembly. For optical products, even a small bubble can cause visual defects, poor light transmission, weak bonding, customer rejection, and expensive rework.
The best materials to avoid bubble generation during optical film die cutting are stable optical-grade films, low-outgassing adhesives, clean release liners, anti-static protective films, and controlled multilayer laminates designed for cleanroom converting.
However, material choice alone is not enough. Bubble prevention also depends on surface cleanliness, adhesive flow, lamination pressure, die-cutting tension, storage conditions, and assembly design.
For OEM buyers, the better question is not only “Which material avoids bubbles?” The real question is: “Which film, adhesive, liner, and converting process can keep optical parts bubble-free from die cutting to final assembly?”
At Sanken Manufacturing, we help customers convert optical films, PET films, TPU films, protective films, adhesive tapes, foam layers, insulation materials, and functional laminates into precision die-cut components for electronics, displays, automotive interiors, medical devices, and industrial applications.
Why Bubbles Appear in Optical Film Die Cutting
Bubbles usually appear when air, dust, moisture, gas, or stress becomes trapped inside the material stack.
In optical film applications, common causes include:
- Dust particles between layers
- Poor adhesive wet-out
- Moisture inside the film or adhesive
- Air trapped during lamination
- Uneven pressure during bonding
- Release liner contamination
- Static electricity attracting particles
- Adhesive outgassing after cutting
- Film stress caused by poor tension control
- Rough die-cut edges causing localized lifting
For customers, the cost is not only the rejected film. Bubble problems may delay product launch, increase labor inspection, slow assembly, and damage final product appearance.
This is why optical film die cutting must be treated as a complete material system, not only a cutting job.
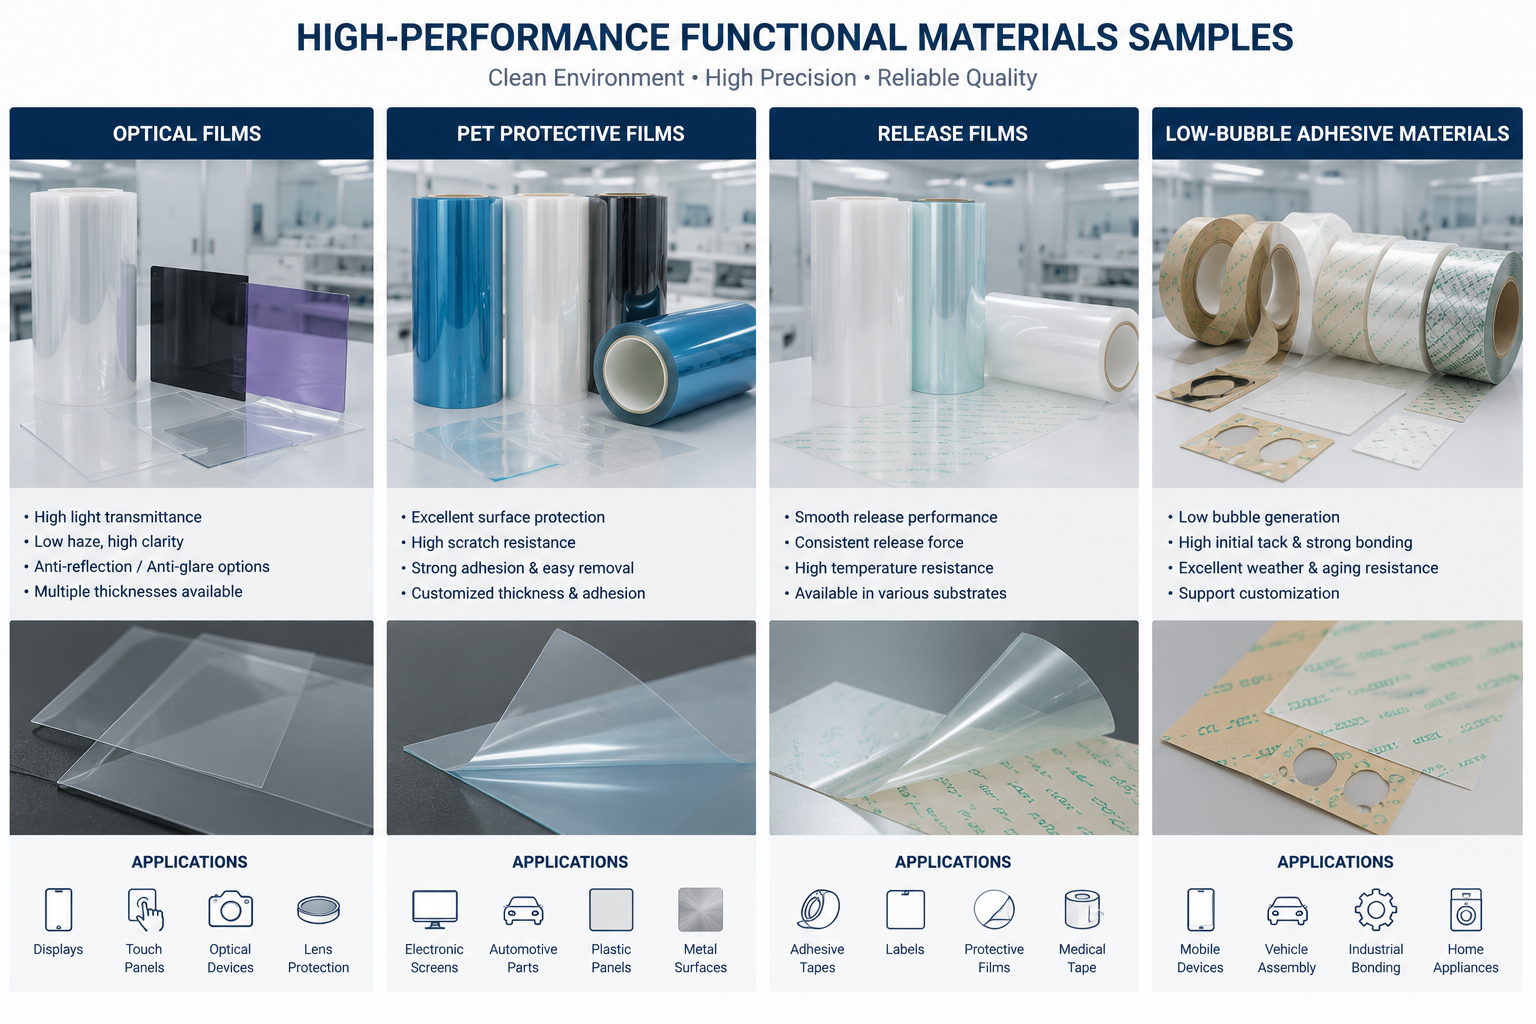
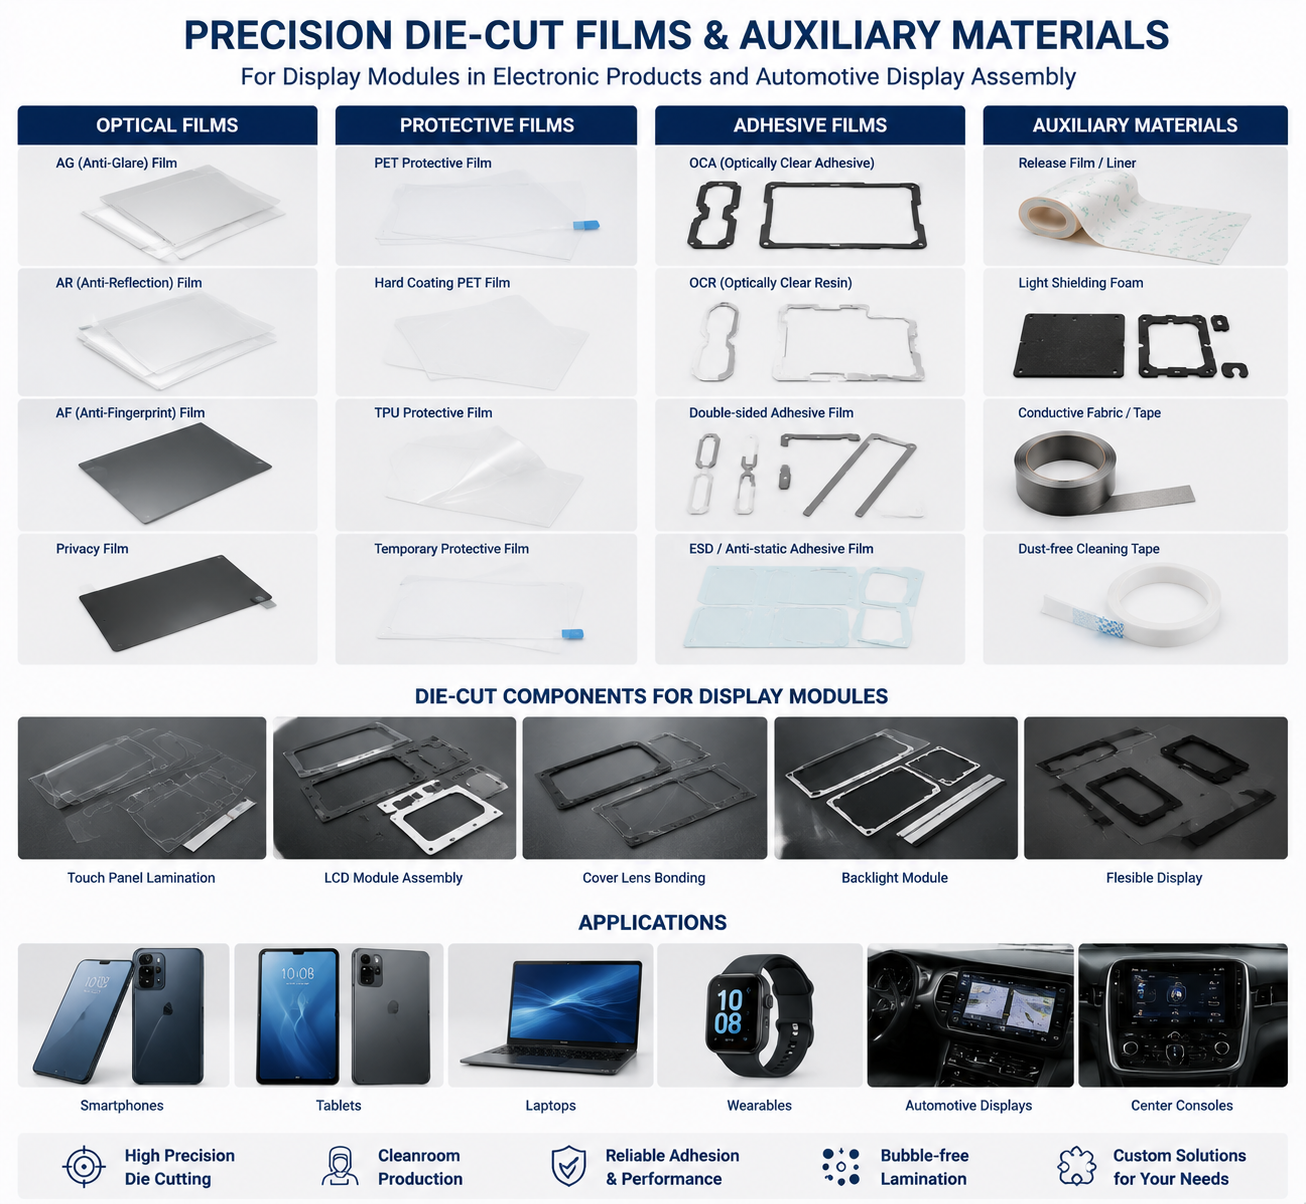
Best Base Films for Reducing Bubble Risk
The base film should have stable thickness, good surface quality, low particle contamination, and strong dimensional stability.
Common optical film choices include:
| Material | Main Benefit | Typical Use |
|---|---|---|
| Optical PET film | High clarity, stable thickness, good dimensional control | Displays, protective layers, insulation films |
| TPU film | Flexible, soft, impact-resistant | Curved surfaces, protective films, flexible electronics |
| PC film | Strong impact resistance and optical clarity | Protective windows, display covers |
| PMMA film | High transparency and surface gloss | Optical panels and decorative surfaces |
| Anti-glare film | Reduces reflection | Display modules and screen protection |
| Hard-coated film | Scratch resistance | Touch panels and optical covers |
Among these, optical-grade PET film is often preferred for precision die cutting because it is dimensionally stable, clean, smooth, and compatible with many adhesive systems.
However, PET film alone does not prevent bubbles. The adhesive layer and lamination process are often more important.
Adhesive Selection Is the Key to Bubble Control
Many bubble issues come from the adhesive layer.
For optical film applications, buyers should consider adhesives with:
- Good wet-out
- Low outgassing
- High transparency
- Stable thickness
- Low haze
- Good aging resistance
- Clean coating quality
- Compatibility with the target surface
Common adhesive options include:
| Adhesive Type | Advantage | Risk If Poorly Selected |
|---|---|---|
| Optical clear adhesive | High transparency and good bonding | Bubbles if lamination is poorly controlled |
| Acrylic adhesive | Good aging and optical performance | May require correct surface energy matching |
| Silicone adhesive | Good removability and heat resistance | May have lower bonding strength on some surfaces |
| Pressure-sensitive adhesive | Easy assembly | Edge lifting if adhesive flow is poor |
| Low-outgassing adhesive | Reduces gas bubble risk | Higher cost but better reliability |
For optical parts, adhesive must flow evenly across the surface. If it does not wet the substrate properly, small air pockets may remain and grow into visible bubbles.
At Sanken, we review the film, adhesive, liner, bonding surface, and final assembly environment together before recommending a structure.
Release Liners and Protective Films Matter
Many buyers focus on optical film and adhesive but ignore the release liner.
This is a mistake.
A poor release liner can create particles, uneven release force, scratches, static charge, or adhesive surface defects.
Good release liners should have:
- Stable release force
- Clean surface
- Low particle level
- Smooth coating
- No silicone transfer problem
- Good dimensional stability
- Compatibility with kiss cutting
Protective films also matter.
During die cutting, storage, and transport, protective film helps prevent scratches and contamination. But if the protective film adhesive is too aggressive or unstable, it may leave residue or create surface stress.
A bubble-free optical part needs every layer to work correctly.
Why Anti-Static Materials Help
Static electricity is a common hidden cause of optical film defects.
Optical films can attract dust easily during slitting, laminating, die cutting, and liner removal.
Dust particles trapped between layers may create visible bubbles or bright spots after lamination.
Anti-static materials can help reduce this risk.
Useful options include:
- Anti-static PET protective film
- Anti-static release liner
- Anti-static packaging film
- Ionized air during converting
- Cleanroom handling procedures
- Low-dust cutting environment
For display, touch panel, optical lens, and electronic protection applications, anti-static control should be considered early.

Material Structures That Help Prevent Bubbles
A stable optical die-cut structure may include several layers.
Common structures include:
| Structure | Purpose |
|---|---|
| PET film + optical adhesive + release liner | Transparent bonding and easy assembly |
| Hard-coated PET + protective film | Scratch protection during handling |
| TPU film + low-outgassing adhesive | Flexible protection for curved surfaces |
| Optical film + anti-static liner | Lower dust attraction |
| PET film + foam spacer + adhesive | Cushioning and controlled bonding gap |
| Film + removable protective layer | Surface protection before final installation |
The best structure depends on the application.
A display protection film needs clarity and clean bonding.
An optical spacer may need thickness control.
A flexible electronics part may need TPU film and soft adhesive.
An automotive display component may need heat aging resistance and strong dimensional stability.
Die-Cutting Design Considerations
Even the right material can create bubbles if the part design is not suitable.
Important design factors include:
1. Edge Distance
If adhesive runs too close to the edge, pressure and handling may cause edge lifting.
2. Small Holes and Narrow Strips
Tiny shapes are harder to strip cleanly. Waste removal may pull the adhesive or deform the film.
3. Sharp Corners
Sharp corners may concentrate stress and increase lifting risk.
Rounded corners are often better for optical adhesive parts.
4. Liner Format
For manual assembly, a well-designed release liner can make peeling easier and reduce touch contamination.
5. Kiss Cutting Depth
For adhesive optical films, kiss cutting must be controlled carefully. Cutting too deep may damage the liner. Cutting too shallow may cause poor part separation.
Process Factors That Reduce Bubble Generation
Material selection is only half of the solution.
The converting process must also be controlled.
Key factors include:
- Cleanroom or clean-area converting
- Proper lamination pressure
- Stable web tension
- Controlled cutting speed
- Sharp tooling
- Accurate kiss-cut depth
- Smooth waste stripping
- Anti-static control
- Clean packaging
- Proper storage temperature and humidity
If tension is unstable, the film may stretch and later release stress. This can create lifting or bubbles after lamination.
If lamination pressure is uneven, air may remain between layers.
If tooling is dull, the edge may deform and cause localized adhesive failure.
Common Buyer Mistakes
Choosing Only by Film Thickness
Thickness is important, but not enough. Surface quality, adhesive behavior, liner cleanliness, and process control matter more for bubble prevention.
Ignoring Adhesive Outgassing
Some adhesives release gas over time, especially under heat or aging conditions. This can create bubbles after the part passes initial inspection.
Using Non-Optical-Grade Materials
Standard PET or standard adhesive may not meet visual requirements for optical applications.
Skipping Cleanliness Review
Dust is one of the fastest ways to create optical defects. Clean converting and packaging are critical.
Testing Only Flat Samples
Some optical films are applied to curved or textured surfaces. A material that works on flat glass may fail on a complex surface.
What Buyers Should Confirm Before Production
Before ordering die-cut optical film parts, buyers should confirm:
- What is the final application?
- Is the film used for display, protection, bonding, insulation, or spacing?
- What optical requirements are needed?
- Does the part require high transparency or low haze?
- What adhesive type is required?
- Is low outgassing important?
- Will the part face heat, humidity, or UV exposure?
- Does the material require anti-static protection?
- What liner format is best for assembly?
- Does the supplier support clean converting and inspection?
These questions help prevent bubble defects before mass production begins.
How Sanken Helps Reduce Bubble Risk in Optical Film Die Cutting
At Sanken Manufacturing, we help customers solve optical film converting problems by reviewing the complete structure.
Our support includes:
- Optical film selection discussion
- Adhesive lamination
- Protective film converting
- PET and TPU film die cutting
- Kiss cutting
- Anti-static handling support
- Clean material processing
- Waste stripping optimization
- Prototype and mass production support
- Custom assembly with foam, rubber, film, and adhesive materials
We focus on preventing common customer pain points:
- Bubbles after lamination
- Dust contamination
- Poor adhesive wet-out
- Liner peeling problems
- Edge lifting
- Visual defects
- Dimensional instability
- Assembly rejection
For OEM buyers, this means fewer trials, lower rejection rates, faster approval, and more stable production.
Conclusion
The best materials to avoid bubble generation during optical film die cutting are optical-grade PET or TPU films, low-outgassing transparent adhesives, clean release liners, anti-static protective films, and stable multilayer laminates designed for precision converting.
However, bubble prevention is not only a material issue. It depends on cleanliness, lamination pressure, adhesive wet-out, die-cutting tension, liner quality, storage conditions, and final assembly method.
At Sanken Manufacturing, we help customers select, laminate, die cut, and convert optical films and adhesive materials into stable components for electronics, automotive displays, medical devices, and industrial products.